
The thing about traveling in such a small camper is one needs to be judicious about what they allow into their space. First it should fill at least one need (preferably at least two) and second it best work harmoniously with the colors, so that everything flows together and not create visual clutter. My decorating plan is: Choose the quilt colors you love and the rest will follow.
Because the Casita has carpet covered fiberglass walls, there are no opportunities for nails or stick on hooks. One is limited to lightweight art hung on upholstery twist pins or steel curtain hooks. The trailer jostles around a bit, in travel, so any art must be suitable to the occasional bounce off the wall.
Enter the desire for a little bit of art and a map of our travels.

What you will need to create your own map
- A small Pre-Primed Canvass in the size you wish to hang. Mine was 8 x 10″
- A Map (printed off the Internet)
- Tracing paper, Painter’s Tape
- A pointed Tracing Tool ( I used the end of a compass point) and a Marker
- A Piece of Bulletin Board Cork
- Glue
- Paints (at least three to match your colors), Paint Brushes
- 2 screw-in picture hanging hooks (to string Hanging Wire)
- Hanging Wire
- Push Pins, Wire Cutter, Safety Glasses and a Receiving Bucket
Start by printing off your map. You may need to increase or decrease the size when you print it. I had to do this at the copy store (with my canvas at the ready) so I could see if I was getting the right size.
Cut out your map and a piece of tracing paper (or graphite paper) to roughly the size of the map. Center and tape the map over the tracing paper on the canvas. Using a pointed tool, begin to trace out the lines on your map. Check every now and then to make sure you are getting all the lines. (I realized I forgot to finish off Oregon and made it a part of California–oops. Hope that isn’t some kind of sign.)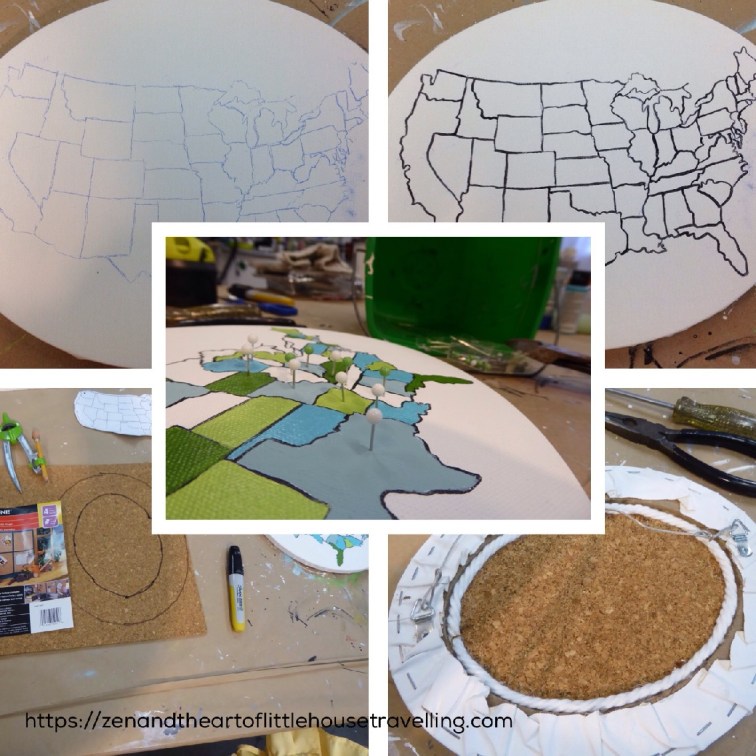
Using a fine liner brush, paint black lines over the tracing paper lines. Be careful not to smudge out your guide lines. Now go back in and paint in the States in your colors. You will need at least 3 colors, plus the canvas color.
Now cut an oval of the cork to fit in the back of the canvas. This will give your push pins something on which to grab hold. Be careful when gluing in the corkboard. You want to only glue in the void spaces and not where a pin might eventually go. In my case, I had a little extra cording handy so I glued that to the back of the canvas and the cork for added measure but I think that was over-kill.
Screw in a picture hanging hook on the left and right center edges of your canvas and string a pretty tight wire. The steel drapery hook needs to catch it low so it doesn’t protrude above your hanging.
Lastly, you’ll need to trim your push pins so they don’t stick out too far. You’ll need a bucket and a wire cutter. Put on your safety glasses. Hold the pin by the head and cut the steel shank about 1 cm down–making sure the pointed end is facing into the bucket (to catch the projectile end, once its cut).
Now, push in your pins, hang your functional art and start planning the next fun place on your bucket list.
©2015,2016 zenandtheartoflittlehousetravelling.com All rights reserved.

What a beautiful and functional map! I’ve been wanting a map for a long time and none of the commercial ones seemed fitting. Yours will be one of my next projects! Thank you for providing detailed directions.
LikeLike
So glad. I hope you’ll post a picture of your version when you are finished.
LikeLike